
![]()
One of the projects I’ve made over the last several weeks is homemade “shrinkydinks.”* Some of you may remember these from your childhood; they were all the rage for a while. You can buy shrink plastic (either shrinkydink brand or not), but I’m too cheap for that – especially when I only need a few small pieces. I read online somewhere, at some point in time, that it is possible to “make” your own, so that’s what I did.
What kind of plastic can be used as shrink film?
Any plastic with recycling code 6 will apparently work for this.

(I’m told that even the stuff that’s styrofoam will shrink, but I’m a bit too chicken to try that one!) It comes in two main “colors” — clear and “frosted.” The frosted stuff shrinks to solid white and the clear stuff shrinks crystal-clear. (I unfortunately found this out by making something where I wanted/needed the background to be white, so be sure you have the one you want.)
My first experiments were with plastic cups, because I already had them.

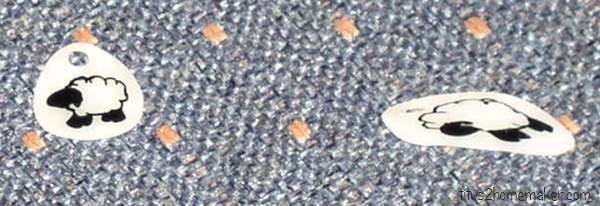
They shrank pretty nicely and, as previously mentioned, result in white plastic. Only use the bottoms of the cups, though, unless you just want to experiment, because the sides shrink in a rather bizarre manner. (It has something to do with their having already been shaped.) Here are two sheep I made; the one on the left was cut from the bottom of a cup, the one on the right from the side of a cup.
When I had satisfied myself that this actually works, I went ahead and made plans for obtaining something with bigger, flatter pieces of plastic, namely, deli containers. I purchased these from our local health food store, which sells sandwiches. I am told that you can buy whole packages from Sam’s Club, and that you can usually pick up one or two from salad bars, etc. (Please ask first; don’t just take them!) The best option, of course, would be to upcycle containers you’ve already gotten food in, rather than getting new ones. I bought a dozen from the health food store for 20 cents (total). These provide larger pieces of plastic, as the entire top and bottom surfaces can be cut free.
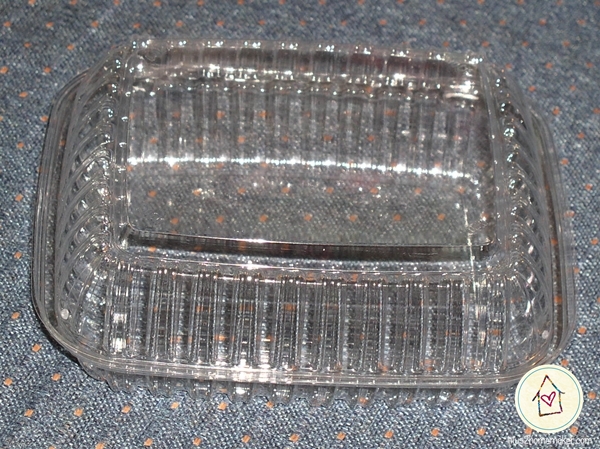
These also shrink up nice and clear. They’re really nice-looking, but be sure your picture doesn’t require a white background before using these!
How does this DIY shrink film thing work?
Okay, here’s what I did. First, I cut the sides off of the cups/boxes, so I was working with just flat pieces.
1. Create your design.
Then I used Sharpie markers to draw my designs on the plastic. For certain designs, I printed off clip art or fonts from the computer, placed the printouts underneath the plastic, and traced them. (It’s easier to color them in, though, if you move the printouts after tracing the outlines.) A piece of white paper underneath helps you to see what you’re doing.
The pieces will shrink to 1/3-1/2 their original size, so be sure to make your original drawings large enough! Here’s a photo of my printout and the resulting pieces (from plastic cups), so you can see how far they shrank.

2. Cut the pieces out.
Cut out your pieces, however you like. As you can see, I had some that I cut out along their outlines (like the letters) and some which I just cut out near the edges (like the sheep). Cutting the interior (like the holes in the A and R above) requires a craft knife like an X-acto knife, and is tricky on the plastic; be careful!
If you are going to want holes in your finished pieces (for keychains, pendants, buttons, etc.), now is the time to make them. A standard hole punch produces a hole that is a nice size once shrunken. It’s actually a tad small for a key ring, but it’s a good size for most jewelry-related uses.
3. Bake the pieces.
Now, you are going to bake the pieces. Preheat an oven to 350 degrees Fahrenheit. Place the pieces, colored side up, on a cookie sheet. (I am told that the air-bake ones don’t work well.) You can use a piece of aluminum foil on it to protect your cookie sheet, just in case, but the pieces shouldn’t melt sufficiently to melt to the pan or anything.
Now, put the whole thing into the oven and watch it. After a moment, you should see the plastic begin to curl, and then shrink and flatten back out. Leave it for a few seconds after it flattens again. The whole process usually takes about 1-2 minutes. (The larger the piece, the longer it takes to shrink, as a rule.)
Remove them from the oven promptly. They will still be a tad pliable for a few seconds so, if they’re not quite flat, you can press them with something hard and flat to flatten them. (I’m told you can also make them into shapes (like rings), but I’ve not tried this.) They’re hot, though, so don’t just pick them up with your fingers. Also, while they’re hot, sometimes the ink sticks to other things a little, so if you press them with something to flatten them, make sure it isn’t something that would be permanently damaged by a little ink getting on it.
Notes on Coloring the Pieces (Before Baking)
Supposedly you can color these, from the backs (so use clear plastic, obviously), with chalk or colored pencils, if you lightly sand them with fine-grit sandpaper first to give the chalk/pencil something to grip. This didn’t work for me. I don’t know if I didn’t sand it sufficiently or what, but it just did not work well. The Sharpies worked beautifully, but it isn’t possible to do white this way. It’s also important to note that the colors become darker/more intense when the pieces shrink (purple looks almost black), so you will need to color them lighter than your desired end result.
I hope someone else has fun with these! Especially if you already have a few plastic cups or a deli container around, these make a great, cheap craft activity when you have a few extra minutes.
Is it okay to bake plastic?
Oh, one final note: Some people wonder about the safety/health of melting plastic. I have seen this project listed on science teachers’ websites and similar sites, so it is apparently at least within a reasonable realm of safety. I’m sure it ultimately isn’t the healthiest thing in the world to heat the plastic (fumes-wise), however –
1. The plastic bakes for a very short time.
2. The pieces most people make are pretty tiny. (Add 1 & 2 together, and you’re dealing with very little of whatever off-gassing there may be.)
3. If the smell is any indication, the shrinking plastic isn’t nearly as bad as the Sharpie ink, and most of us use these pretty regularly.
(Some people who are really concerned, bake them in a toaster oven outside.)
*Shrinkydinks is a brand name. Obviously, these DIY pieces are not actually Shrinkydinks, and are more properly referred to as “shrink film.”

I would never have thought you could make shrinkydinks at home. Thanks for the idea.
Cool – my boys are gong to love this in a few months!!
We are going to have to try this project one day!
When I was little the only thing I liked about my mom making liver was the plastic tubs in came in. We made our own Shrinky Dinks (1970 something) – love it when great projects come back round again. Thanks for the reminder and the very comprehensive tutorial. And if anyone knows what the recycle code for meltable plastic is in the UK could you let us know?