I received a copy of this book from the publisher to facilitate my review. As always, all opinions expressed here are entirely my own.

Send Something Beautiful
When I first saw this book, it caught my eye. The cards on the front cover look so simple, but so beautiful! So I was excited to check it out. There’s more variety here than I first expected. The book contains twenty-five different projects, which are easy to locate from the “project selector” — a visual table of contents that indicates the start of each project with a thumbnail image and provides the page number.
Getting Started
The beginning of Send Something Beautiful is introductory material: selecting supplies, basic techniques, etc. One of the things I really like about this book is that it doesn’t require a broad selection of specialty supplies. You will, however, probably want one of these:
ELMERS X-Acto #2 Knife with Cap, Silver (X3602)
One tip I would add, that I didn’t see anywhere in the book, is to cut smaller details first.
The Projects
The projects in this book are all mailable; however, they are not all cards. There are a number of cards, a couple of envelope embellishments, and a handful of miscellaneous fun things to send by mail. Most craft books I’ve seen have a few projects that are just kind of lame. This one has a few I’m not likely to use, but I only saw one project that I thought was just weird. (There’s a mobile, with tears falling from an eye.)
Although some of the projects are a little tedious, making use of some rather intricate detail, none are so complicated in their construction that you’d need to be an expert to create them. They’re all pretty accessible. They use a variety of techniques, too, so it’s a good opportunity to learn some fun methods.
For Example…
I decided to try out one of the projects just to get my toes wet. It’s actually a trifold card (in the book), but I only did one pane, just to check it out. This illustrates the one issue I had with the book: the templates. There’s a crease built into the spine to help it lie flat(ter), but I still found it difficult to hold the book flat enough to get the template to copy well. (I wish they were available to download somewhere or something.) As you can see, my copy came out pretty warped.

Since I wasn’t really making a card, I decided to just go with it, try to adjust it a little as I cut so it wasn’t quite so crooked, and live with a little bit of irregularity.
I wanted a bit of a stained-glass effect. I also wanted a quick-and-dirty method, since I was just trying this out for kicks. My solution was to snag a sheet from my journal (a watercolor “sketchbook”), lightly scribble on it with watercolor pencils, then smudge it with my wet finger. Like so:

All dry:

Then I set myself to cutting out the template. I layered the template over a sheet of black cardstock on a cutting mat (don’t try to do this on your bare kitchen table or something!), then cut out all the holes with my craft knife (like the one I showed you above). When I got partway up, I just “scooched” the template over a tad so it wasn’t quite so crooked. For the circles, I cheated and punched them with a hole punch.

Then I trimmed the painted paper to size and glued it to the back of the black piece. (I used glue stick, because someone lost the glue I had with my art kit. It made smeary places; I wouldn’t recommend it. Or at least be more careful than I was.)
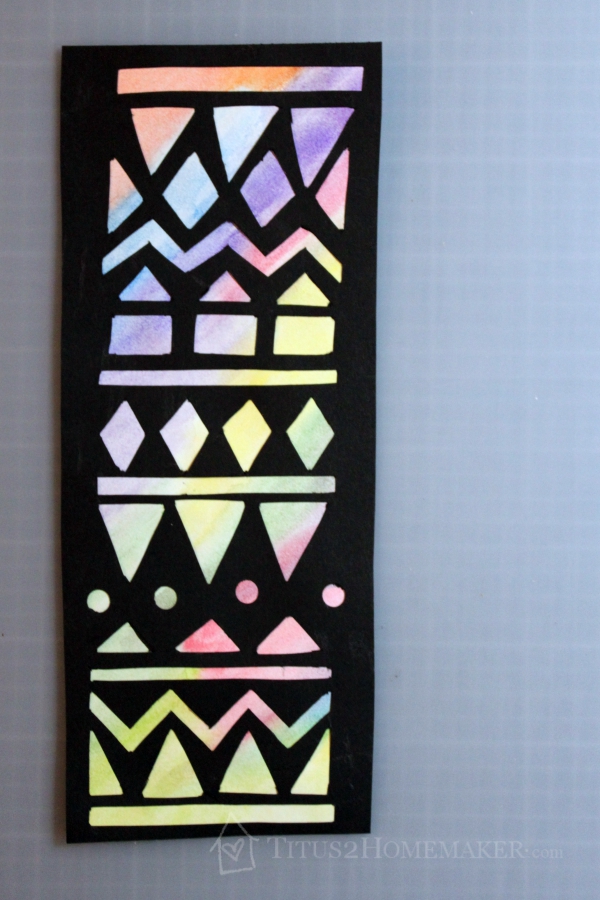
I’ll probably run this through my laminator and make a bookmark.
As you can see, what I made is rather different from the original project in the book, but also pretty similar, so it’s a good example of how you can vary the projects to make them your own. (I really like that gold in the original, too, though!)

Leave a Reply