Why Make Your Organizing Pretty?
Organizing generally requires putting items into containers of some sort. Any container (of the appropriate dimensions) will do: yogurt cups, diaper boxes, shoe boxes, etc. But I don’t feel like things look very organized if everything is in different containers – especially if the containers are covered with the print that details their original contents.
For me (perhaps because I’m very visually-oriented), things simply appear less cluttered if there’s some cohesion to the design of the containers. The problem is, containers can be expensive! If you want everything to match – even more so.
So what’s a frugal girl to do? Decorate the containers! There are a number of inexpensive options for coating, covering, and/or embellishing your containers to give them a sense of “sameness,” even if the original containers have nothing in common save the ability to hold things.
How to Add Beauty to Your Organization
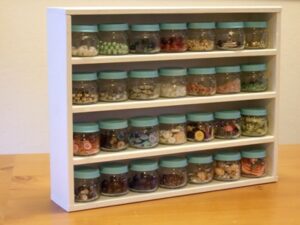
Paint: Cheap and easy, paint can be applied to almost any surface. And it’s available in pretty much any color you can imagine. Paint everything the same color, and it’s amazing how much unity you create. See how nice the baby food jars on the left look, with the lids all painted the same color?
The only thing that generally doesn’t paint well is plastic, and if you really need to, there are ways around that. Plastic spray-paints are now available. If they don’t come in the colors you need, you might try choosing a neutral shade to use as a sort of “primer.” Or you can paint fabric or paper with which to cover the container. Or just find paper, fabric, or one of the other materials in a color or pattern that coordinates with your paint.
Fabric: Being thin and flexible, fabric has a multitude of uses, as well. It’s available in a variety of colors and prints to match almost any style. A benefit of fabric is that you can use a fabric to sew your curtains, throw pillows, etc. – and then use that same fabric to cover or accent boxes, jars, or bins, so your organization truly blends with your décor.
Paper: Paper has some of the same benefits of fabric. It’s great for covering containers, because it will bend and fold to fit the contours. It has a little less flexibility and durability, though, than fabric. Keep in mind that there are many types of paper: scrapbooking paper, origami paper, wrapping paper, tissue paper (great for decoupage!), shelf paper…
Ribbon: In most instances, you will not be using ribbon to completely cover anything. But ribbon has similar advantages as fabric, in that (assuming you use the right ribbon), you can sew with it and “craft” with it. Applying it doesn’t take as much skill as sewing, though. You can add it as an accent to your textiles, and to your boxes and bins. You can weave it through baskets, tie it onto handles, or even wrap it around napkin rings. Use it to make hanging loops. The point is, it is very versatile, and can be a nice way to bring a common thread into a variety of objects throughout your room.
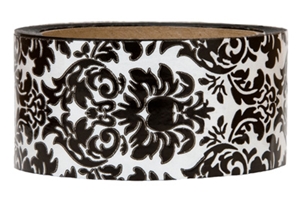 Designer Duct Tape: This has got to be one of the easiest ways ever to add a sense of style to a variety of items. (I especially love this damask duct tape from TapeSwell!) Because it’s duct tape, this will stick to anything from yogurt containers to file cabinet drawers. (Wouldn’t it jazz things up to paint a file cabinet a single pretty color, and then put a stripe of coordinating patterned duct tape across each drawer?)
I like things like this, that require no skill! If you can cut and stick tape, you can use designer duct tape to carry a design element throughout your space.
Stickers, Markers, Rubber Stamps: While these items are not likely to provide you primary coverage for storage containers, stickers, markers, and/or rubber stamps can be used to embellish containers with a consistent motif. If you choose a fairly common design, you may even be able to combine this technique with others.
For instance, I love black damask. Fortunately for me, it’s pretty popular right now. I can get damask rubber stamps, duct tape, paper, and fabric (even vinyl!). They all come from different sources, but they’ll all coordinate because they’re more-or-less the same.
Thinking Outside the Box: Sometimes, you can add aesthetics to your organizing simply by organizing with items not originally intended for that purpose. In place of a bin, use a pretty serving bowl. In place of a can or plastic canister for cotton swabs, use a creamer or teacup from the thrift store. Ideas like this are all over if you can change your perspective.
Your Ideas
If you have other ideas for “prettying up” your organization, I’d love to hear them!
Disclosure: TapeSwell provided me with a couple rolls of the duct tape shown above, for the sake of this series. You’ll be seeing more of it later, in actual projects.

In my very shallow medicine cabinet, I stored lipstick and other small items in the tops of crystal/glass butter dishes, turned upside down. I stood makeup brushes in cut glass cups and cotton swabs in vintage jelly glasses.
The toothpicks are in a silver creamer on the counter. I drop earrings into cut glass ashtrays or bowls on the dresser to corral the little things. Even a cupcake tin can hold paper clips, rubber bands, etc (you could spray paint it if you wanted). Forks on end in a glass hold important and oft-used business cards (in the tines).
And I love that black damask duct tape! Who’d have thought? And it goes with your new black and white damask throw that you got from someone who loves you veerrrrrrry much. 🙂
My veerrrrrrry soft black damask throw I got from someone who loves me veerrrrrrry much. 😉