
Happy Safety Pin Day!
What can you make with safety pins? Check out all the jewelry and related ideas below! You’ll find lots of cool ideas and links to handy tutorials (and inspiration). But be sure to keep reading to see my own awesome project at the end!
Bracelets
- Safety Pin Bracelet tutorial
- Another Safety Pin Bracelet Tutorial
- “String” seed beads onto your pins before making the bracelet.
- Or magazine beads.
- Or wrap them with floss, fiber, or wire, etc.
- Or try different metals when choosing your safety pins.
Bracelet Inspiration:
Multicolor ZigZag by PinPrikStudio
Magazine Bracelet by Spanglings
Telephone Wire-Wrapped by gr8byz
Black & Anthracite (From Etsy, but no longer viewable on Etsy, so this is an older Pin.)
Necklaces
- Safety Pin Necklace tutorial
- Another Necklace tutorial
- Tribal-Inspired Beaded Necklace tutorial
- Beaded Necklace
Necklace Inspiration:
By Kimical Warfare on Etsy (Pin – no longer viewable on Etsy)
Earrings
- Earring tutorial (by Mich. In L.A. – She makes some amazing stuff with the quirkiest bits of “junk.” Check out her whole blog; it’s really awesome!)
*****
(Note that the color of “brass” pins varies by brand.)
*****
Beaded Safety Pins
I’m sure you’ve seen them: an American flag made of seed beads on safety pins, all attached another safety pin that goes the other direction. Or maybe some other design. Have you ever tried to make your own?
- Beaded Safety Pin how-to (with tips & links to a few basic patterns)
- Flag & Cross patterns
- Patterns (variety)
- Christian fish pattern
- Yellow ribbon pattern
- Blank pattern grid (for creating your own)
I thought it was kind of silly that the only blank pattern grid I could find was just a single grid. That’s what, a sixth of a piece of paper or something? So I created a sheet that’s a pageful. You can sketch out several designs on a single piece of paper, or work at perfecting one design over multiple attempts. Download it here:
Blank Beaded Safety Pin Pattern Grid
Other Beaded Safety Pin Projects
- Christmas trees (Look carefully at the image and you’ll see what supplies were used. There isn’t an actual tutorial.)
- Angels
- Tiny baskets (tutorial)
TIP: One experienced crafter suggested that once your project is completely assembled, it’s wise to use pliers to pinch the pins closed. Otherwise, they may pop open on you at inopportune times.
Miscellaneous Crafty Things with Safety Pins
- MYO (make your own) safety pin from a paper clip (how to)
- Safety pin wings for the back of a jacket (tutorial)
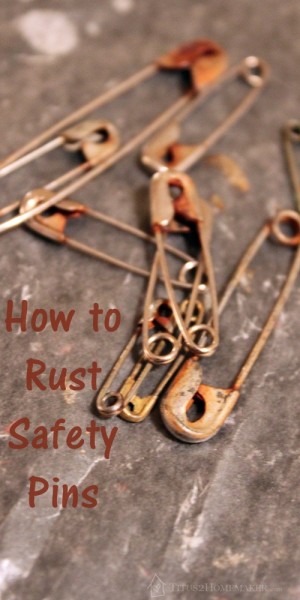
- Use rusty pins to dye fabric.
My Art Journaling Project – Dyeing Paper with Rusted Safety Pins
I didn’t have any fabric I wanted to dye, but I wanted to try this on paper, for art journaling. It worked beautifully!
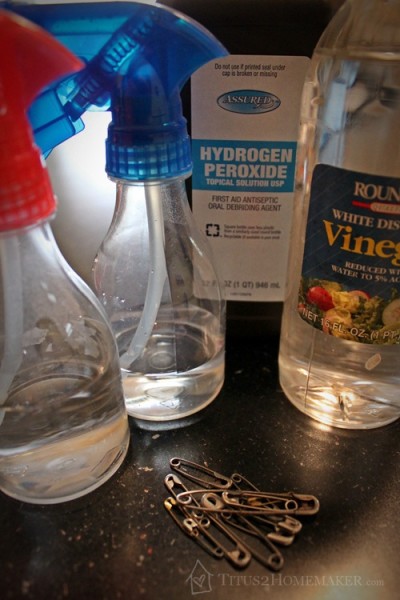
First, I needed rusty pins.
All of my pins were new-ish – nothing rusty – so I needed to jump-start the process. I put out a piece of waxed paper to protect the surface, then sprayed them with the vinegar and peroxide (two separate bottles) I use for disinfecting. (The liquid soaked through, so you might need something sturdier under your pins.)

I let them sit for a few hours, flipped them over, and let them sit overnight. Partway through, you could see them start to turn. A couple of the “brassy” ones actually starting foaming green pretty early on. Interesting!


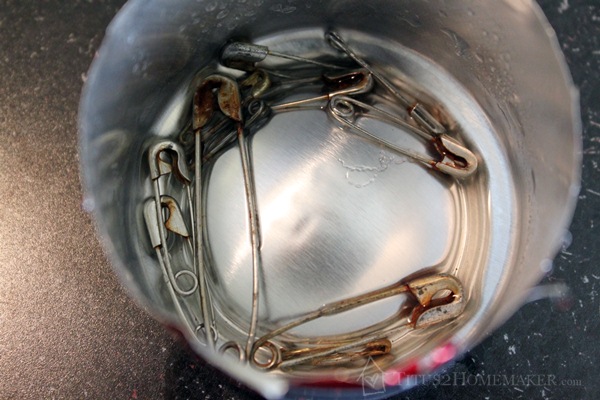
But ultimately, they got “old” and rusty. (Well, the brassy ones still had that verdigris.)


I don’t know if you can tell in this picture or not, but there are some parts of some of the pins that are still shiny. I think they come with some kind of coating or something to try to prevent rust, so I should have sanded them first. I didn’t, so I went back at this point and lightly sanded the shiny parts, then put them in the bottom of a soda can with some vinegar and peroxide for a little while longer.

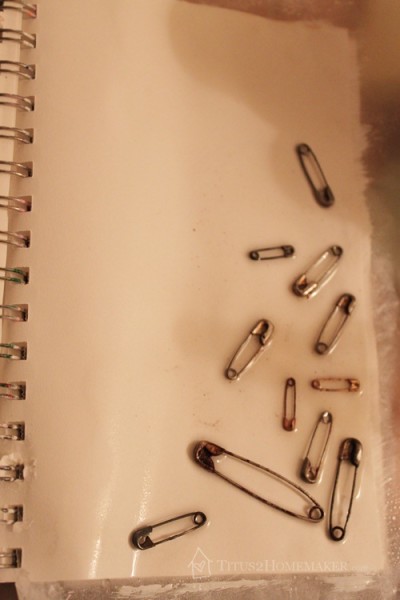
Ah! Better! So now I had my pins I need to rust the paper.
I started by scattering the pins where I wanted them on the journal page. (Again, putting waxed paper below the page to protect the others. Do keep in mind that this will “bleed through” to the back, so be sure you have a blank page on the back, not a treasured journal entry.) I forgot to dump out the tiny bit of liquid still in the bottom of my soda can, so my page got a bit overly wet.
Then spritzed them and the page with a 50/50 mixture of water and white vinegar. (Ideally, the whole page should be damp, but there should not be those little puddles around the individual pins. That’s where the liquid came from the can.)
Lay a plastic bag on top.
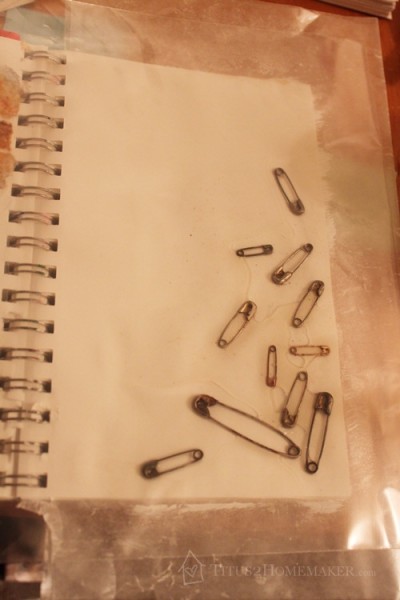
Then place something flat and reasonably heavy on top. I grabbed these school books that were close at hand. You just want to keep the pins firmly in contact with the paper. Leave it overnight.
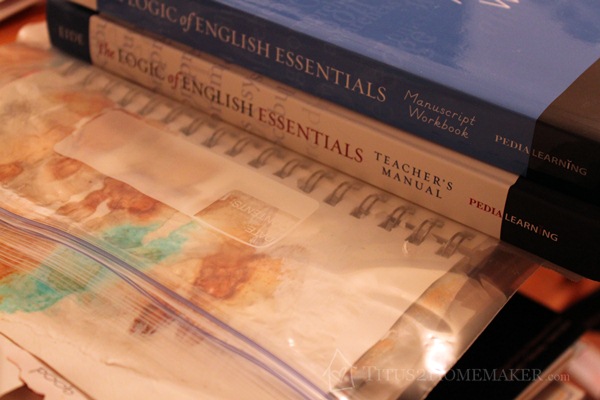
In the picture above, you can catch a little glimpse of something else I did. The waxed paper from where I initially rusted the pins was pretty cool-looking – especially with that green spot. So I tore it to size and stuck it into my journal, too. I glued it in, and then coated it, with clear gel medium to “seal in” the rust. You’ll see it again in my “after” pictures.
The next day, I removed the books…
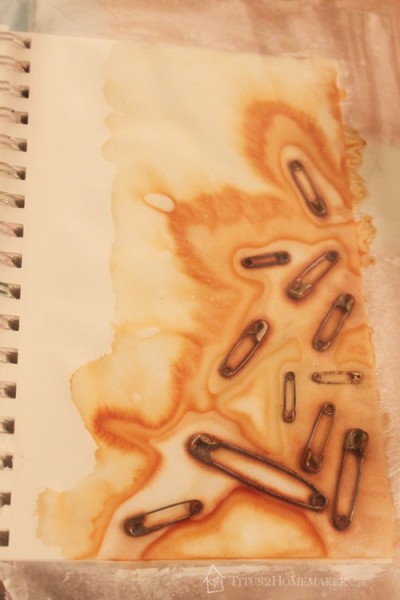
…and the plastic…

…and the pins.

And then just left it to continue drying. Pretty cool, right?


Leave a Reply