
Craft supplies can be really expensive…but do you really need the “official” tools and supplies? That depends. In some cases, the quality is so radically different that the name brand is recommended. In other cases, certain features may be available in the “real thing” that are truly time- or frustration-saving. But, often, there are less expensive alternatives available — especially for those who just dabble. Let’s look at some of these options.
Important note: all prices are current as of the drafting of this post. Obviously, prices fluctuate and these may not all be correct by the time you’re reading.
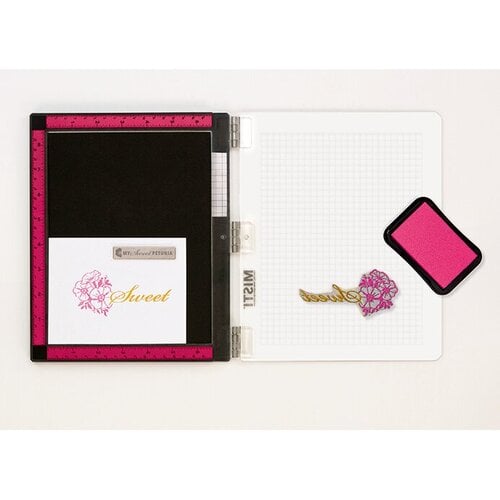
MISTI or Other Stamp Positioning Tool
MISTI stands for “Most Incredible Stamp Tool Invented.” Created by My Sweet Petunia, this is a stamping platform intended to enable crafters to stamp and restamp on the same piece without worrying about whether their stamps have shifted. As of this writing, it was $69.95 at Amazon; $59.99 at Scrapbook.com.
There are now several knock-off products, each with slightly different features. For instance, the Press to Impress Stamping Platform by Crafts Too (which is $32.49 from CraftStash — or get 15% off as a new customer with email signup) is open on the opposite side from most stamping platforms, which adds some interesting benefits.
And several people have created DIY versions, of varying quality.
Is this a tool you need at all? No, but…kind of. A stamping platform — of some kind — does something truly unique. And in my opinion if you’ll be stamping on more than rare occasions, it’s probably worth it for the hassle it saves you. Even just the ability to restamp your image if you don’t get a good impression the first time can save a lot of wasted or ruined products. (I don’t know; maybe everyone else is better than me at lining their stamps back up.) But I don’t feel like the name brand is necessary.
Let’s compare:
Original MISTI, reg. $59.99 @ Scrapbook.com, stamping area 6.5×8.5″Press to Impress, reg. $32.49 @ CraftStash, stamping area 7×9″DIY, varies, potentially $15-ish if you already have some basic tools


There are other options, but these are a top-of-the-line, middle-of-the-road, and inexpensive DIY representation.
DIY Stamping Platform
I came across a lot of different DIY versions of this. Some were only a couple of dollars. Unfortunately, most of those either used materials most people wouldn’t readily have on hand (and that’s why they were so cheap — they used what their makers had available), or they didn’t look like they’d hold up the way a purchased platform would.
I wanted something in between, so I’m assembling a version that riffs off of this one I found on YouTube. It uses:
- a Dollar Tree clipboard (for the base — sturdy, and you don’t have to cut anything to size)
- Dollar Tree LEGO knock-offs (3 packages)
- small acrylic hinges (I bought these for just a few dollars — the 30x33mm; you can also check eBay)
- a clear acrylic clipboard
Depending on whether you can find the (clear) clipboard in person or have to order one, your price might vary a bit. I was able to get one for around $6 on Amazon. (This is just easy because it’s already cut to size, just like the base. You could also look for a picture frame with acrylic in place of glass and swipe that, or get a sheet of acrylic cut to size.) Depending on what type of stamps you intend to use with it, you might also need a couple sheets of craft foam.
Assuming you’re a crafter who already has some basic tools and things on hand, like a drill to remove the clipboard clips, and a viable glue, you should be able to make this for around $15 or less, without a ton of finagling, and have a pretty sturdy end product. If you don’t already have things like this on hand, it might cost you less in the long run to just buy one of the less expensive made-to-order platforms.
The downside is that it won’t be magnetic, so you’ll need to use tape or something to hold your paper in place. If you happen to have magnetic sheets or magnetic paint on hand, you could adjust for that, but if you have to buy it, you’ll quickly lose the price advantage of making your own.
The “official” bar magnets are 0.125 inches thick, so if you do somehow make yours magnetic, that’s what you’ll want to look for.
(I’m working on finalizing this and making a tutorial, so stay tuned!)
Pusher Tool
Gina K’s friend made her a pressure tool to make stamping with the platform (or large stamps) easier on her hands. These quickly caught on, and several different places are offering something similar. There are a number of things you can use to serve this function, though — essentially anything with a surface that has (or will take) a large felt pad and allows you to comfortably hold onto it.
air hockey striker/pusher/malletdry erase markerpaint edger (the kind that takes a pad)

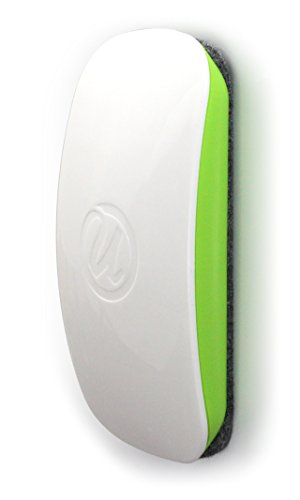
You can find some of these items at the dollar store. (I’m also curious about those pop-style phone stands, if they would work.) If you’ve unmounted your wooden stamps, a leftover large stamp block might work well, too. Just add a felt furniture pad — or maybe a bit of self-adhesive craft felt.
(The purpose of these, in case you’re unfamiliar, is to make it easy to apply pressure to the stamp. This probably isn’t necessary at all, unless you have arthritis or something, or perhaps if you do a lot of stamping at a single sitting. But if you want one, I wanted to let you know there are a lot of inexpensive options.)
Scoring Board
A scoring board is a grooved board that you place your paper on before running a scoring tool along the groove. This would be especially useful for someone who makes a lot of cards (to create the fold in the card) or handmade boxes or something like that.
These vary a lot, in size, style, etc. Some of the “big-name” brand options include one from Tonic Studios for $36.89* (12×12.8″), EK Tools for $29.29 (12×12″), and We R Memory Keepers for $36.29 (13×13″). So these are all fairly comparable in size, and the price range is about $30-36.
Crafter’s Companion has one for $11.99 at CraftStash. It’s a bit less square than the others, though, at about 8-1/4 x 11-3/4″ — or $29.29 for 12×16″. The measurements on this are going to be primarily in metric.
(EK Tools are less expensive on Amazon, and the smaller one has envelope score lines on the back, which is kind of cool. Some reviews say the measurements seem to be a little “off,” though, so YMMV.)
So…look around; price-compare, and see what features you want — including the trade-off of size & portability.
Other options to consider:
If you already have a sliding-style paper trimmer, it may take scoring “blades.”
OR, there’s the fancy trim & score board by We R Memory Keepers. This is large, but it folds up. When I found it, it was $26.98 on Amazon (OR there’s an ecraft version (for $19.39 when I checked), which is quite similar but doesn’t have 1/8-inch increments marked). If you don’t already have a trimmer, this seems to offer a lot of flexibility, both in what you can do with it, and with the usable-surface-to-compactness balance.
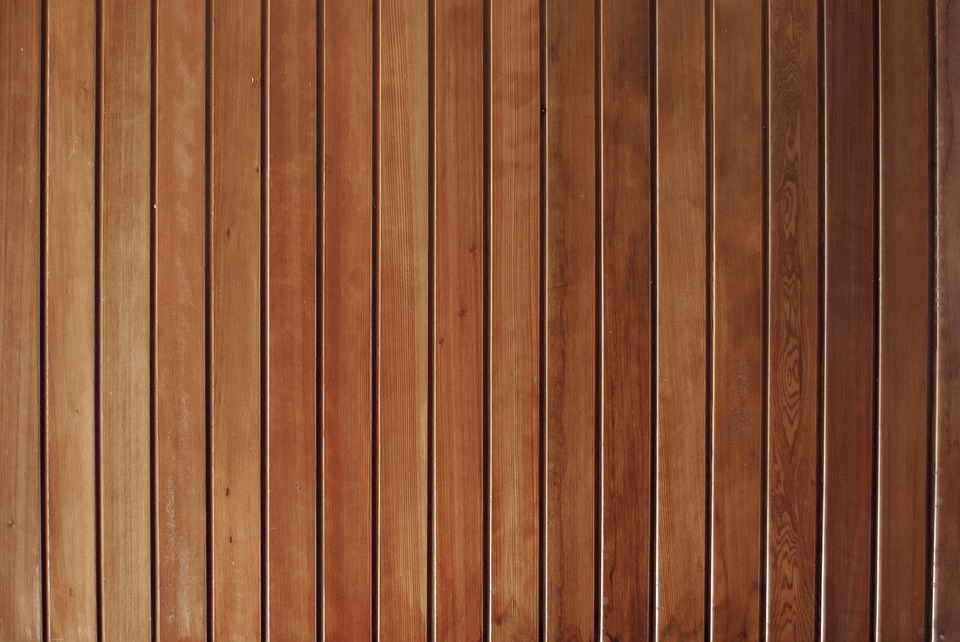
Another blogger also found a fabulous DIY alternative: grooved paneling! If all you need is a groove to run your scoring tool along, a piece of paneling can do the trick. (And you might even be able to get your hands on a scrap for no cost at all.)
This is also a tool that most crafters can probably simply do without.
Let’s compare:
We R Memory Keepers, $25-ish @ AmazonCrafter’s Companion ScoreMaster, $11.99 @CraftStashgrooved paneling, scraps or samples, FREE or a few dollars


(Remember, these aren’t all possible options; they’re just representative of three “tiers” of products/options.)
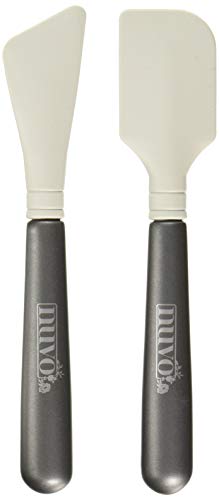
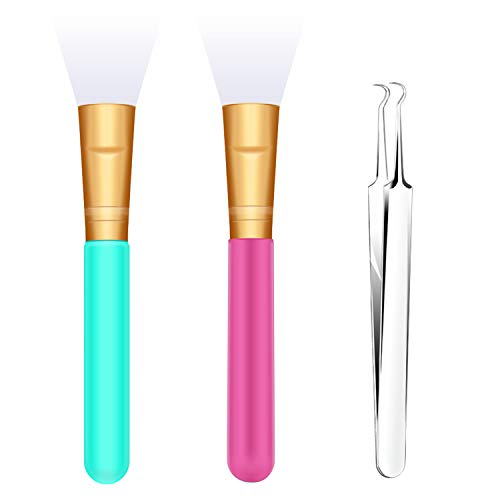
Silicone Spatula/Applicator for Texture Pastes
For $9.99, Tonic Studios sells a set of small silicone spatulas for texture pastes and that sort of thing. These are nice, because they’re small to fit inside the small bottles, and the silicone allows any excess to be easily scraped off. But there are other options, too.
I paid $2.29 for a pair of silicone makeup applicators on Amazon. (They also came with a pair of “blackhead removers,” which work as small tweezers.) The ends are curved, so they need to be trimmed straight, but then they work fine. Dollar Tree also has single applicators like this in many stores for (of course) $1. Our Dollar Tree also had the double-ended Betty Crocker silicone spatula (and our Dollar Tree is pretty small and crappy, in terms of selection, so that’s saying something). The larger end is too large to fit in the jars, but the smaller end is a good size.
Let’s compare:
Tonic Studios Nuvo Media Spatulas 2/Pkg, reg. $9.99Makeup Applicators, 2/Pkg + blackhead remover, $2.29mask applicator or silicone spatula, $1 @ Dollar Tree

Wax Picker Tool
“Picker tools” are designed for picking up and moving tiny embellishments like rhinestones and sequins. They come at a variety of price points and in a variety of styles, but they’re also pretty varied in their quality for the purpose. If they’re not “sticky” enough, they won’t pick up the embellishments — particularly larger rhinestones. If they’re too sticky, they won’t “drop” the embellishments again once you’ve placed them.
The “gold standard” here is the Silhouette Pick-Me-Up or the Quick Stik: $9.70 at Amazon or $7 at Scrapbook.com when I checked.
If you search for “nail dotter,” “rhinestone picker,” “wax picker,” etc., you can find similar tools for around $4 or $5, often with extra replacement tips. Perhaps even lower at AliExpress.
Let’s compare:
Quickstik Craft Tool by We R Memory Keepers, abt. $9.50Rhinestone Picker Dotting Pen, abt. $5 w/ extra tipPicker Wax Pencil Acrylic Beads Handle Tool, abt. $2.75

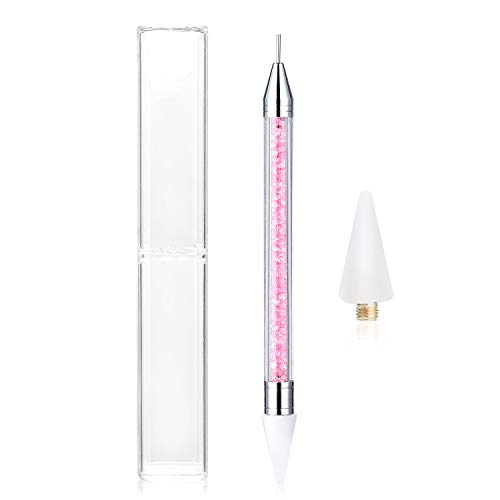
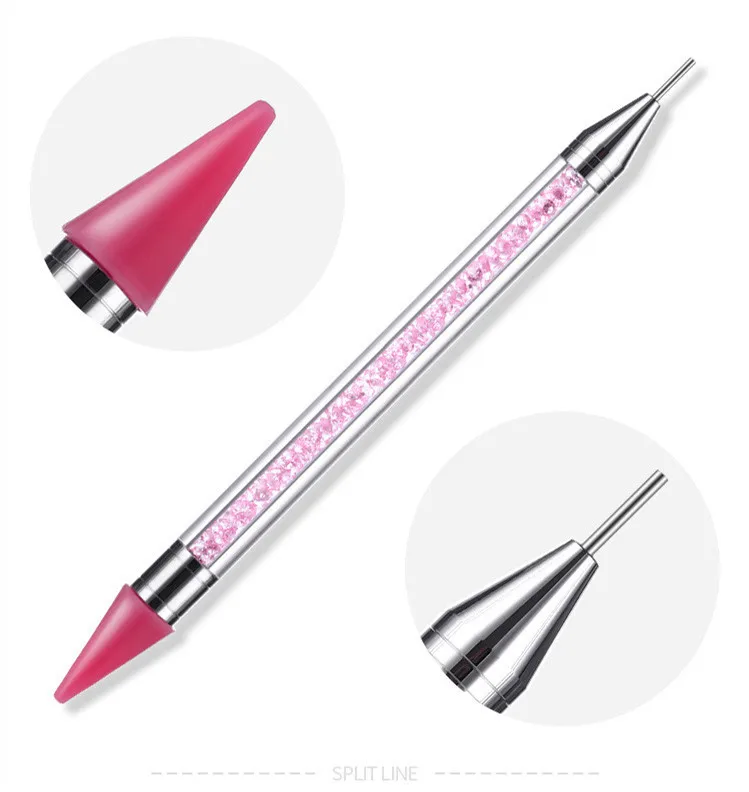
There’s also a pencil version — it’s super-cheap (like this; but you can get them from AliExpress or something and get just one) — but in my opinion it’s likely to get confused with a standard white colored pencil in the craft room.)
You can also DIY with a wooden cuticle pusher, toothpick, bamboo skewer, etc. & candle wax.
DIY options can be more finicky at letting go of lighter things, so if you’re using it regularly, you might want to grab a less expensive nail art picker that’s purpose-made. If you only use it on occasion, you might want to go with a free DIY option.
If you only need one, you might not save that much; more of a savings if you get them in a set — either of multiples, or with rhinestones, etc. (like this or this). But you can easily find replacement heads, which doesn’t seem to be the case for the “official” crafting tools. (Also keep in mind that nail rhinestones and sequin can be used on cards and scrapbook pages rather than fingernails!)
Ink Blending (Sponge Daubers & Blending Brushes)
Okay, ink blending is a little tricky to talk about, because there are multiple options for ink blending. In general, there are four basic ink blending tool options:
- foam blending tools
- detail foam blending tools (the same thing, just much smaller diameter)
- toothbrush-style blending brushes
- broad, flat blending brushes that you hold in the palm of your hand
These serve different purposes. Foam versus bristles/brush is somewhat a matter of technique, but largely a matter of personal preference. Most people who use foam prefer domed blending tools because they give better control over the ink when you want to get into a smaller area.
The brushes have an important difference, besides just how you hold them: toothbrush-style brushes are typically domed, so you get more control for blending details or smaller areas in general, and gives softer edges to the inked area. The other style of brush is typically flat across the surface, which is better if you want to ink the raised surface of an embossed paper, or something like that.
In each category, there are various options. Cosmetic foam comes in a variety of sizes and shapes.
48 Cosmetic Sponge Round Foam ApplicatorWonder Wedge Cosmetic Wedges150 Pack Disposable Eyeshadow Applicators


These are not going to give you the same control as a purpose-made tool, but you can find them pretty inexpensively in bulk (even at the dollar store — I found wedges & eyeshadow applicators). So that’s one option. But let’s talk about more “targeted” options.
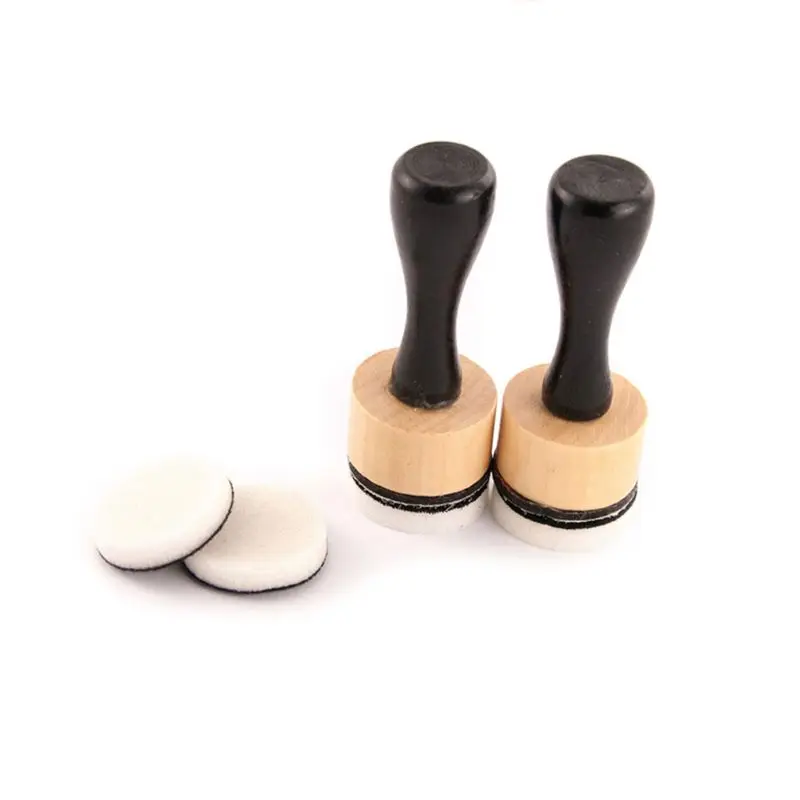
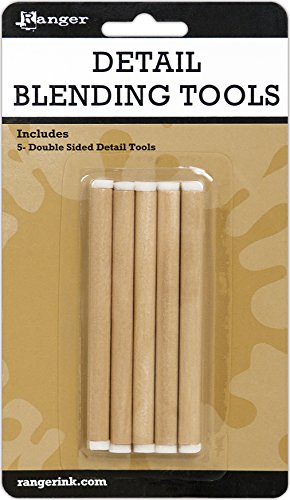
Ranger’s main ink blending tools (the foam daubers) retail for $6.99/2 handles (with 4 flat foams included), with replacement foams (domed) $6.99/10. Their Detail Blending Tool (which is basically small lengths of dowel with foam on the ends) is $5.99/5 dual-ended tools. (And I keep seeing complaints that the foams fall off these detail ones.)
Scrapbook.com has their own brand of foam blending tools that come in a variety of configurations of handles & extra foams. You can get 2 handles with 5 (domed) foams for $8. (On sale as of this writing at $5.49.) AliExpress also has various options, including this set of two handles with 4 (flat) foams for $4.12, postage included.
Let’s compare:
Ranger 2 foam blending 2 tools handles + 4 foams, $8.55Scrapbook.com 2 foam blending tool handles + 5 domed applicators, $8 retail2 foam blending tool handles + 4 foams, $4.12 @AliExpress

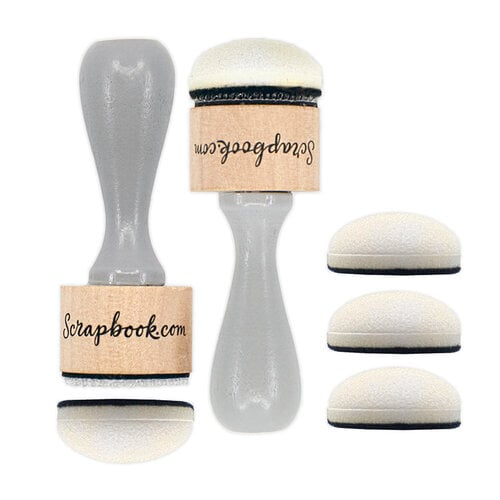
In this case, it might be worth it to buy the handles from AliExpress and then stock up on domed applicator refills from Scrapbook.com. (I expect these should all be more-or-less interchangeable.)
I’m not aware of any direct alternative to the Ranger detail blending tools — but I’m also not inclined to pay premium prices for dowels with foam that just falls off. You could just buy dowels (especially if you have a saw and can easily cut them shorter) and then punch out or cut out pieces from the round, flat foam cosmetic applicators. That would be cheaper for the price, but also kind of a pain.
You could use eyeshadow applicators, which are also helpfully small, but possibly not as round as you might prefer.
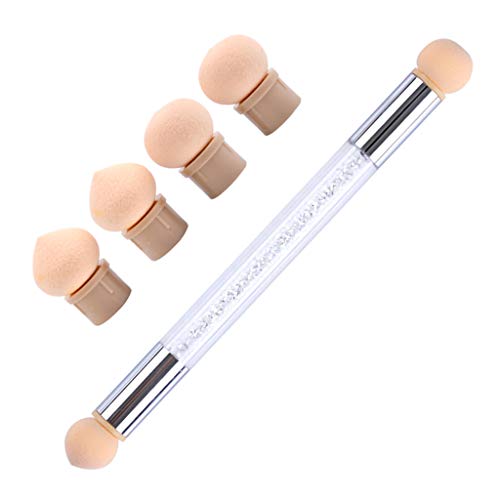
Another option is nail art sponge tools. The foam ends on these are thicker than the Ranger detail tools, and they aren’t really any less expensive, but they seem to be sturdier. The replacement heads are about $2.50/6 or as low as about $3.50/10. You can sometimes find them on eBay or AliExpress for less.
Ranger Detail Blending Tools, 5/$6.87Sponge Nail Art Tool Pen, $5.66/dual-ended handle + 6 spongesNail Art Pen, $9.99 for 3 dual-ended handles +12 Replaceable Sponge Heads

There are also finger daubers, which you can get at all the usual places, including AliExpress.
On to brushes…
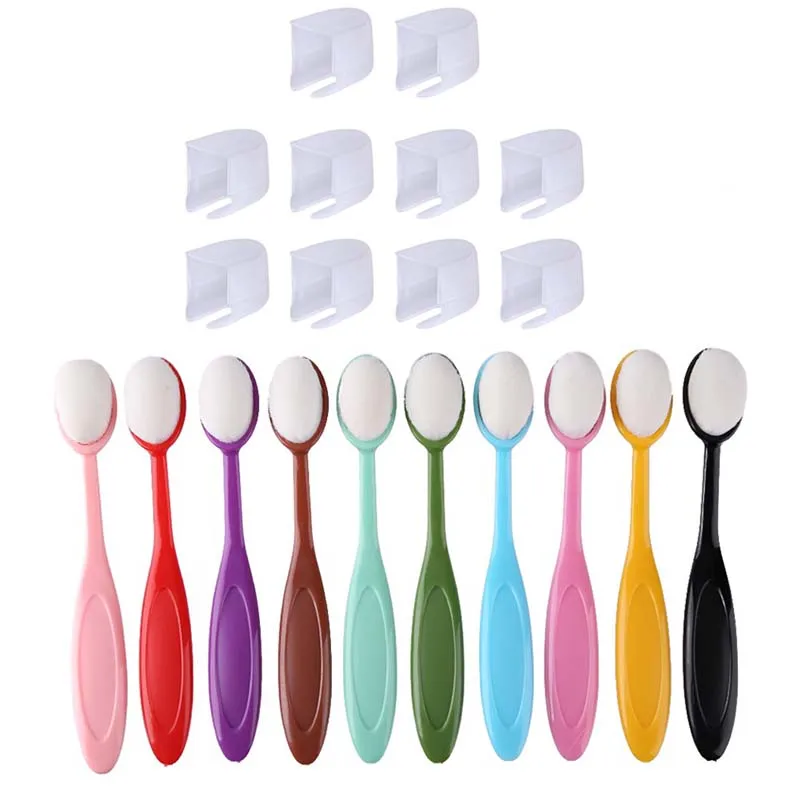
The “official” toothbrush-style ink blending brushes are around $4-5 each. Generic ink blending brushes can be procured for around $1.75-2.00 each, like these or these. (There’s even storage!) On AliExpress, you can even get them for a little over $1 each — with caps if you want.
Dollar Tree also has makeup brushes of a similar style. The quality doesn’t seem to be that great (and they’re pretty small), so if you can get the AliExpress brushes, that’s likely a better bet. But if you need something local and would rather spend $1 than $4 or $5, they might be worth a try.
Let’s compare:
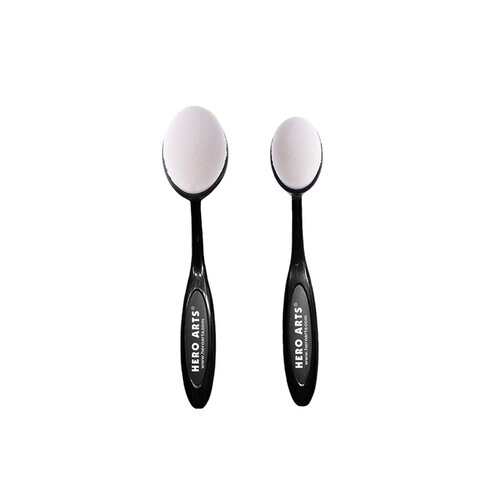
Hero Arts ink blending brushes, 2/$10New Craft Ink Blending Brushes, approx. 5/$10Ink Blending Brushes with caps, 10/$11.86

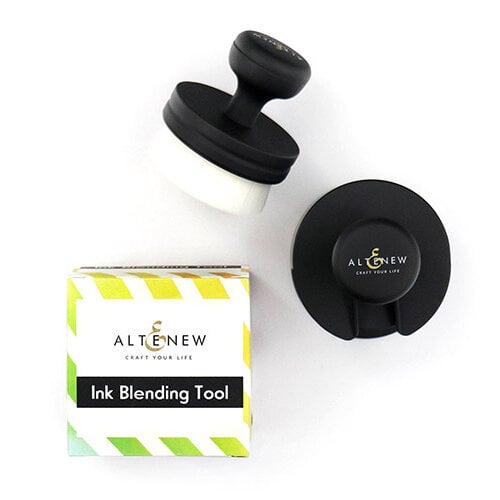
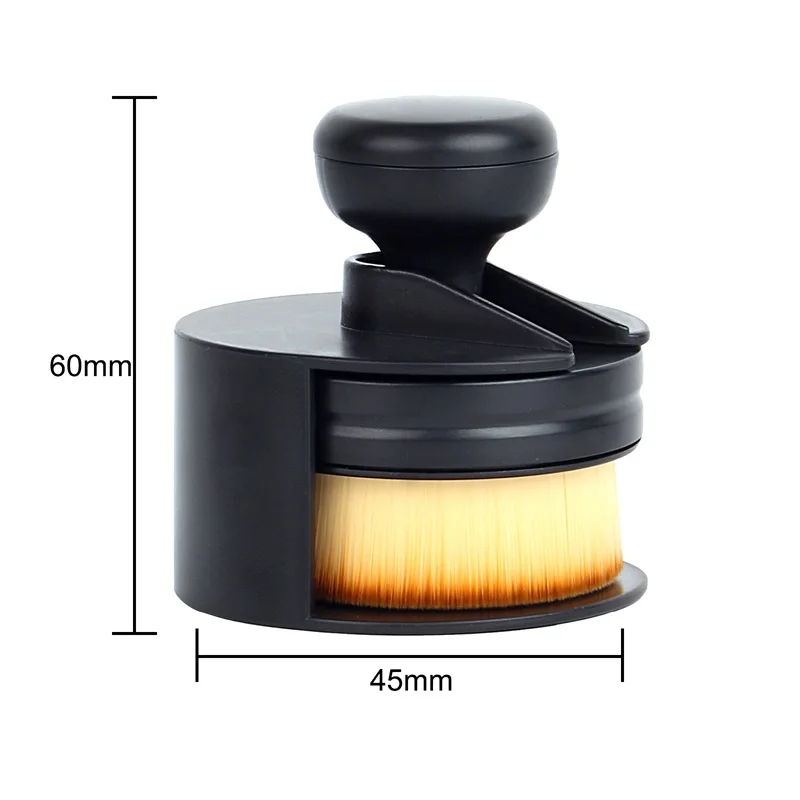
The larger blending brushes, like the one from Altenew, are about $11-12 each.
Generic brushes are available $9.99/2 (or $6.99 if you prefer a color). Or even as low as $4.28 each from AliExpress.
Let’s compare:
Altenew blending brush, $12Yoseng Flat Top Ink Blending Brush, Ink Blending Tool, $6.50, or 2/$9.99Ink Blending Tool, $4.28 @AliExpress

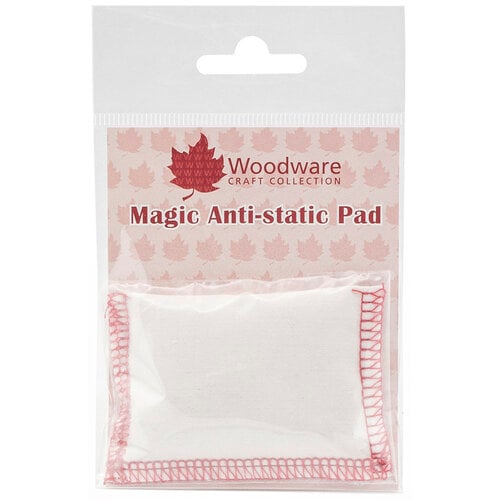
Anti-Static Bag for Embossing
An anti-static bag for embossing is a powder bag you brush on the surface of your paper before you ink it, to help prevent embossing powder, glitter, etc. from sticking to other parts of the paper due to static.
Several brands make these, and the price points vary. I’m not aware of any reason that any particular brand is better than another. (This is a pretty “generic” type of product.) You can easily spend as much as $8 or $9 on one of these, although you can also find them for a bit less. This is the type of product that should last you for ages, so you can certainly buy one.
But you can make a DIY one for almost nothing if you don’t mind spending a few minutes. All you need to do is put some baby powder, cornstarch, or similar type of powder into a thick stocking, finely-knit sock (like a nylon baby sock), or a doubled or tripled standard nylon stocking. This is a great use for odd socks, or knee-highs that no longer have matches because the other one ran.
If you have to buy the materials, you can get them for no more than $2 by shopping the dollar store. (I don’t know if they have cornstarch or baby powder, but they do have stockings, and cornstarch is usually under $1 at the supermarket or drugstore.)
Woodware anti-static bag, $6.50DIY version, $2 or less

Heat Tool (for Embossing, etc.)
There are — as you might guess — multiple brands of heat tools for embossing, with various price points. Most of them range from about $20-30. The Wagner is one of the more commonly recommended ones.
A generic tool in a similar style will typically do pretty much the same job, though. (I do recommend looking for a dual-speed tool.) I bought this one for about $12, and it’s been serving me well.
Note: The Ranger Heat It craft tool — the one that looks like a hair dryer — is terrible for embossing. They say you can use it to emboss, but I’ve been almost entirely unsuccessful with it. It takes so long that I just burn my fingers and warp my paper and it never seems to get around to melting the embossing powder. So while it is good for things like drying watercolors or inks, it isn’t the dual-purpose tool I was hoping it would be. If your primary goal is heat embossing, I absolutely do not recommend this.
Let’s compare:
Wagner Dual Temperature Heat Gun, approx. $22Dual Temp Mini Heat Gun, approx. $12


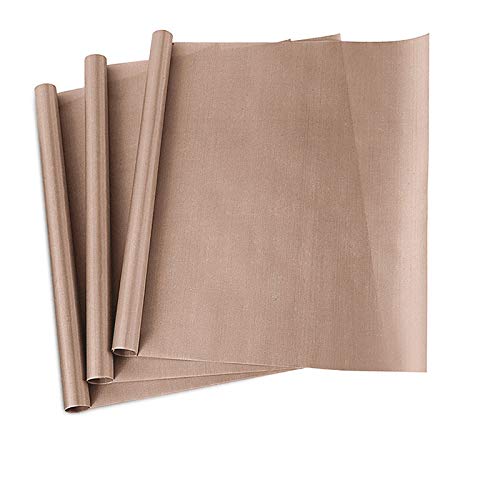
Craft Sheets
The Ranger Inkssentials craft mat is a nonstick Teflon sheet. It’s heat-resistant and waterproof, so you can do things like heat emboss over it, and you can also use it for ink blending and that sort of thing. It costs around $15-18 and is 15×18″. I’m not sure how thick it is. It’s pretty thin — like paper, not like a silicone hot pad — but I’m not sure if it’s thicker than more generic, similar products.
You can get these mats for much less, though, so if the thickness is not a big question/concern for you, you can definitely get more bang for your buck. This listing, for instance, at the time of this writing, is for THREE 16×20″ sheets…for $6.99. (Or get a 4mil-thick trio for a couple dollars more.)
Let’s compare:
Ranger 15×18″ Craft Sheet, $15.263 Pack 16×20″ Teflon Sheet, $6.99
Gelatin Plate
A gelatin plate is more-or-less what it sounds like: a “plate” or thick sheet made out of gelatin. It’s used as a surface for transferring paint or ink, to make prints. You spread the ink or paint onto the surface with a rubber brayer, use various tools to remove ink if you like, to create texture, then lay your paper face-down on top to pick up the ink/paint and make a print.
The storebought gelatin plates come in a variety of sizes and shapes, but the most “standard” size is probably the 8×10″, which is about $21-25, depending on brand. Or you can make your own. Here’s another DIY recipe. (Start here for the recipe on-screen; go back and start at the beginning to see it done.)
If we use this second recipe and want to fill an 11×7″ pan (probably the closest equivalent to the 8×10″ plate) 1″ deep, we’ll need about:
- 7.5 Tbsp. unflavored gelatin powder (in the ballpark of 2 boxes if you’re using packets)
- 1-1/2 c. water
- 3/4 c. rubbing alcohol
- 3/4 c. glycerine
By my calculations, other than the pan itself, this comes out to probably around $3 for the gelatin (less if you have bulk gelatin), about $6 for the glycerine if you’re buying bottles just for this (less if you count the per-ounce price and are buying an efficient bottle size), and about $2 for a bottle of rubbing alcohol if it isn’t on sale (which is probably about twice as much as you need). You can get an 11×7″ pan from Dollar Tree. (It looks like this has the necessary smooth bottom.)
So altogether, it will cost you about $12 to make a gelatin plate roughly the same size as the $20+ one (and twice as thick!), and it doesn’t really take any skill other than heating and pouring.
Let’s compare:
Gelli Arts 8×10 gel plate, approx. $25Gel Press 8×10 gel plate, approx. $21DIY 7×11+ gel plate, $12 or less


You will need a rubber brayer if you decide to work with these long term, and I’m not aware of a notably less expensive way/place to get them. If you just want to play around a little bit, you can probably get away with using an old gift card or credit card to spread the ink or paint on the plate.
Odds & Ends
Adhesive erasers can run as much as $4 or $5 each if you buy them from well-known crafting brands. But if you buy generic ones, they’re much less expensive. You can even get them from the dollar store.
I also like to buy generic stamps and dies. I don’t have a lot of dies, but they’re virtually all generic, and so far I’ve had exactly zero trouble getting them to cut through. In fact, I’ve even experimented with some thicker-than-average materials and they still cut great.
With stamps, it’s a little more complex. I have a lot of cheap stamps (mostly from Wish.com – if you’re a new customer, use my coupon code: nnqdygh and you should get $5 off.) and I’m pretty happy with most of them, but you do need to be aware of a few things. The really good stamps are photopolymer. The cheapers stamps are usually silicone or acrylic. They have different properties, and the photopolymer is a better quality, but I’ve found that they pretty much all do the job.
The acrylic ones can sometimes be super-difficult to peel off the backing, so that can be rather frustrating — and might be something you want to avoid if you have arthritic fingers or something. A lot of my cheap stamps don’t give me any trouble with this, though. If the ink on your cheaper stamps is beading up instead of applying evenly, you can (very!) gently rough up the surface with super-fine grit sandpaper or a fingernail buffer.
If you’re buying foreign-made stamps — especially cheap ones — with words on them, proofread them well, too! You know how we get weird-sounding instructions sometimes when instruction manuals are translated from Chinese? Well…stamps can fall prey to something similar. Here’s an example from my own collection. (I was okay with this, because I actually bought this set for the prints, not the sentiments, but you wouldn’t want to order something like this unaware, if you needed the sentiments.)

Obviously with either of these types of products, it’s largely a matter of designs, so if there’s something you want from a given company, you’ll have to get it from them. But there’s also a pretty wide selection from suppliers like AliExpress. (That’s where most of my dies have come from, and a few of my stamps.)
DIY Texture Paste, Alcohol Inks, etc .
I love fun and colorful…and/or textured…and/or shiny/sparkly substances to craft with. Homemade products are rarely, if ever, going to compare in quality to purpose-made products like Glimmer Paste (love Glimmer Paste!), Adirondack Inks, etc.

But DIY products can help you expand your selection, use what you already have on hand, make something you realized at the last minute that you needed, and try new techniques with little outlay.
Which is to say, I have/use both. I have purchased products — and I also have and use DIY materials.
See how I made alcohol “ink,” shimmer spray, envelope glue, and “enamel” dots here in this post. (Note that none of these are my original ideas. Where I got them from a particular source, that post credits the original. Some are more general ideas that are just kind of “around,” without a single specific source.)
There are also DIY texture paste recipes floating around. These are all some combination of:
- baby powder or baking soda (presumably cornstarch would also work, since that’s the main ingredient in baby powder)
- white acrylic paint or gesso
- white glue or Mod Podge
Quantities seem to vary a lot. You’re definitely going to want a lot of the powder and a little of the glue, but I’ve seen a very wide range when it comes to the paint. One uses 4 parts* powder, 1 part each of paint and glue. I also see recipes that use twice as much powder, or that use the same quantity of paint as powder, so…this is clearly not an exact science. Play around with it.
Several people have also reported that this homemade paste puffs up when heated, so that’s something to be aware of. You probably don’t want to use a heat gun to hasten drying if you don’t want it to puff, but you can use it to your advantage in instances where you do.
*A “part” means that you can use any measurement you like, as long as you use the same measurement throughout — so you can make a very small total amount or a very large total amount. So your part could be 1 tablespoon or 1/4 cup or 1 pint…depends on how much you want to make.
(I’ve also seen people suggest wall spackling as a substitute for texture paste, so if you happen to have some of that around, give it a try!)
Make DIY glitter out of your trash. Or out of cellophane. (I don’t recommend using your regular coffee grinder for this.)
Amazon Basics Electric Coffee Bean Grinder, Black

Glycerine can be used as a substitute for embossing ink (although personally I find “real” embossing ink more effective; I find the glycerine a little less sticky) and for other inky purposes.
Rubbing alcohol (or I often use vodka because it smells better) has a lot of uses around the craft room, too, for making alcohol inks, using as an alcohol ink blender, reviving alcohol-based markers, cleaning things up, etc.
Stamp Mounting
Unmounting your rubber stamps and preparing them instead for use with acrylic blocks can save space, as well as enabling you to use these stamps with your stamping platform. But the purchased sheets for making them “clingy” are about $5/sheet (and usually come in packages of 10). The DIY approach is about half that per sheet.
Advanced: DIY Embossing Powder
Making embossing powder is a bit more involved, but it can be done. There are a couple YouTubers demonstrating how you can extract it from floor wax (here and here [it’s video 2]). This is not quite as clear as commercial products — and it isn’t likely to be as fine, so it’s definitely better for some purposes than others. But it’s interesting, at least — a fun science experiment to do with the kids. (Here you can see the result of the second tutorial in action.)
GEO Sustainable also has a video about making it from milk, which I’m eager to try, although I don’t have any idea what the art quality is of the end result.
You also can use existing clear embossing powder and dye it yourself with alcohol inks. (I would guess you can also use small amounts of RIT dye, much like the way the alcohol inks above are made.) You can also add glitter.
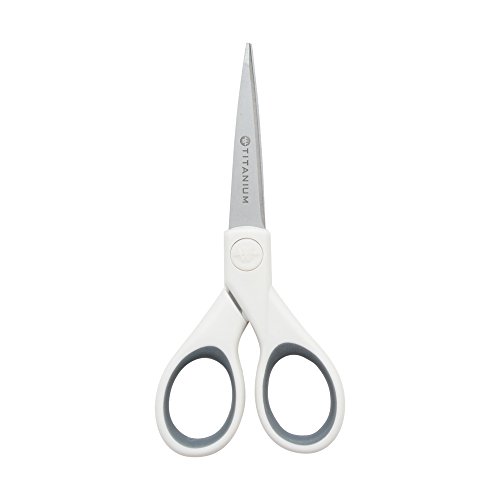
Don’t Cheap Out: Blades
When it comes to pretty much anything with a blade, you want to choose a good quality brand. It doesn’t necessarily have to be a fancy brand with a price tag to match, but you don’t want to get the cheapest generic option, either.
I do nearly everything except cut out fabric with a pair of classic Fiskars kids’ scissors. I find that their blades are consistently sharp and they just work. (I’ve actually found them capable of cutting through fabric in a pinch, but fabric shears are better.) I just stumbled across a pair of nonstick Fiskars student scissors, though, and I’m looking forward to trying those. (Nonstick is especially nice if you’re cutting through something like label paper or double-sided adhesive sheets.)
If you need precision-tip scissors, Fiskars has those, too, as does Westcott, which is another well-known-but-not-too-high-end brand. (I’m not so sure about these “KUONIIY” scissors, but they seem to get good reviews for crafty purposes.)
Fiskars 154110-1001 Non-stick Titanium Softgrip Detail Scissors, 5 InchWestcott 5KUONIIY Micro-Tip Scissors, Pointed Sharp Titanium Blades, 4-Pack(6 Inch)


Don’t Cheap Out: Ink
Okay, caveat here: I have bought some cheap inks, and they can be useful in certain applications. But be aware that the quality is usually decidedly different. So, for instance, the Hampton Arts inks I got give me a good variety of colors for a low price point — but they bleed much more easily than my better-brand inks. That’s okay, but it means I need to know what I can and can’t do with them. They aren’t interchangeable with the better inks.
Do you have favorite DIY or less-expensive alternatives to name brand craft supplies or tools? Share in the comments!

Leave a Reply